Sunday, February 27, 2011

DIY Kitchen Utensil Holders

I saw this picture on one of the craft blogs I follow and fell in love instantly:

source

These were made using the plastic showcase boxes meant for Beanie Babies!   It’s too bad I didn’t have more of those boxes or else I would definitely copy these.

As I as thinking more about this craft, I realized I didn’t need 3 separate holders as I already have a couple bamboo ones in the kitchen.  I decided I only needed 1 extra for now.  I have tons of circular vases left over from the wedding centerpieces, and since they were only $1.00 a piece (love the Dollar Tree), it would be okay if I messed up a couple if this craft didn’t go how I planned :)

Here is my version…definitely smaller than the inspiration pic above, but the size works in our kitchen.  Maybe someday when we buy our forever house, I can copy-cat the white box versions. 

kitchenutensilholder4

It is made with a circular vase, scrapbook paper, mod-podge glue, double-sided tape, and burlap.  Since I already had the mod-podge, tape and burlap from other projects, I only needed to purchase the paper which was already on sale at JoAnn’s.  I was so excited to find the yellow kitchen-themed paper – it goes perfectly with the browns and green tones in our kitchen now.

This was a very easy project.  Basically you start by measuring the paper to fit around your vase (I started with a full piece of the brown paper first).  I used the double-sided tape to stick the paper to the vase and taped in three different places so the paper stuck evenly around the entire vase. 

Then I used the mod podge  and painted the entire outside of the vase so all the brown paper was covered.  Once that dried, I measured the yellow paper to fit the vase and followed the same process with taping the paper (it did stick pretty well to the mod-podged brown paper).  Then I did a second layer of mod podge, waited for it to dry, and then cut some burlap strips to go around and cover the edges of the yellow paper. 

I’m pretty happy with how it came out :)  You can see the edges of the paper in the back but since it will be facing the kitchen wall, no one can see that.   Here it is with the rest of my kitchen stuff:

kitchenutensilholder3

The bamboo holder with the silver top is one I’m thinking of replacing…I like my homemade holder better as it’s a bit taller so it’s perfect for all the serving spoons we have.  I think it will also look better if I had two matching homemade holders and then the larger bamboo holder that I LOVE from Crate and Barrel.  Yay for more storage!

Sharing at:

Photobucket

Tatertots & Jello Weekend Wrap-Up

Someday Crafts Whatever Wednesday

Saturday, February 26, 2011

Cake Decorating Class – 1st week

On my 101 for 1001 list I included a goal of attending a cake decorating class, and since my college roommate follows my blog (hi J!), she told me about a month ago she was going to take a Wilton class at Michael’s.  Of course I was excited to sign up!  Their first course in the series of three, Decorating Basics,  is not too expensive at Michael’s (it was $22.50  total for 4 weeks), though you do have to buy materials and things that are not included in the beginner’s kit (about $22 if you use a 40% off coupon) for each week.  Overall, I think I will spend about $100 total for materials needed for 4 weeks of classes, including the cost of the course and the beginner’s kit.

I will just start off saying that I have NO practice baking or decorating cakes.  I have made simple cupcakes and muffins before and that’s about the extent of my “cake” baking experience.  Luckily the Wilton’s Decorating Basics course is meant for people like me :)

The first class we went over a lot of basics, like how to properly bake a cake, the materials you will need to bake and decorate correctly, some tips and tricks, etc.  We also learned how to make the classic buttercream icing.  To be honest, this frosting is just a bit too sweet for me so I’m not sure if I will use it in the future when I decorate cakes for my own personal use.  I think I’m going to research some recipes that use cream cheese or not as sugar.  

We decorated cookies the first class, but I didn’t take any pictures as they were fairly simple.  We did a lot of stars during this class, which is a design technique I can actually handle and am pretty good at! 

random 012

Since I don’t have any pictures from the first week, the one above is from my horrible cake I made for the 2nd class, but I will share more of that next time :)

Thursday, February 24, 2011

It’s Friday...let’s have a drink!

This week flew by…but no complaints here, TGIF! 

One of my goals on my 101 in 1001 is to eat at some non-chain local restaurants that I have never been to before, so last weekend we went to a nice Italian gourmet restaurant that is a couple towns over.  It was a little pricey but we were expecting that since we checked out the menu online ahead of time.  The food and service were decent, and overall we had a good experience. 

I ordered the Sweet Potato Pizza which was very very different.  I’m not sure I would recommend it as I was expecting more sweet potato flavor.  For desert I had the Banana Chocolate Chip Olive Oil panini…yes panini.  It was amazinggggg and I think I would go back again just to order that.  It’s  made with banana bread and chocolate and then all lightly grilled so it’s melty and just delicious.

For drinks…hubby got a really good lemonade/soda mixture that was full of alcohol but you couldn’t taste it.   I believe it was called a Sicilian Lemonade.  And I had a Melon Sparkler.  It was like a martini but instead of vodka it was made with Midouri Sour and a couple other liquors.  It was definitely a drink you had to sip slowly but I enjoyed it.  Best part…coconut rimmer! 

melonsparkler

Excuse the phone pic…hubby took this because I was too embarrassed to take pictures with my actual camera. 


Oh weekend, how good it is to see you!  Happy Friday!

Friday, February 18, 2011

It’s Friday…let’s have a drink!

A couple weeks ago we went to Longhorn’s for dinner and I decided to switch it up from getting my normal Desert Pear Margarita.  Instead I ordered a Blackberry Firefly Tea, which was a very good decision.  So good, in fact, that I had two :)  Not too many ingredients go into it – the tea includes Handcrafted Firefly® sweet tea vodka, cranberry juice & blackberry flavor.
 

It was definitely sweet so if you’re not into sweetened tea, you probably will not enjoy it.  I enjoy the raspberry iced tea at Dunkin Donuts, and it reminded me of the Firefly Blackberry Tea.  I loved the flavors of the different juices, though, in Longhorn’s drink.  It’s a recipe I will definitely want to try out at home sometime in the summer and create something like this….
 

And I just took a sneak peek at the nutritional facts for Longhorn’s menu and I’m glad to report my usual entree choices are not too unhealthy – woo hoo!  Happy Weekend!

Thursday, February 17, 2011

A Look Inside

I saw this PersonalDNA Test on a few other blogs I check out every so often and thought it would be interesting to see what my results were.  I was a little surprised with the director results, but as I read the entire report, I think the majority of it is pretty close to who I am.  I especially like how it recommends what you can do to be different – those were pretty spot-on to what I want to change about myself.  It only took me 15 minutes or so to complete the test and it’s free, so you should take it!

You are a Director

  • As a DIRECTOR, you combine an unusual openness and passion for beauty and style with confidence and a down-to-earth sensibility that allow you to realize your vision.

  • You are practical and pay attention to the details that others tend to miss.

  • By focusing on what is real and concrete, you achieve more than those who always have their heads in the clouds.

  • When it comes to what really matters in your life, you are confident in your ability to succeed.

  • Having beautiful things in your life gives you pleasure and satisfaction - you have a keen eye for style.

  • Even when problems present themselves, deep down you know you will overcome these challenges.

  • When routines get too familiar, you become bored and start looking for ways to spice things up.

  • You are open to new types of experiences – you are not afraid to take a risk on something new.

  • You have a highly developed sense of taste – you know what looks good on you, in your home, and in the world at large.

  • You're not one to force your positions on a group, and you tend to be fair in evaluating different options.

  • You prefer to have time to plan for things, feeling better with a schedule than with keeping plans up in the air until the last minute.

  • You have a strong sense of style and value your personal presentation - friends may even seek your style advice from time to time.

    If you want to be different:
  • Occasionally let yourself dream a little more, even if it doesn't seem practical or efficient.


    You are Faithful

  • Your trust in others, respect for tradition, and caring nature make you FAITHFUL.

  • Maintaining a few intimate relationships is more important to you than knowing a lot of people, and you share a lot with your close friends.

  • Those who have managed to get close to you value your camaraderie, and they know that they can trust you with anything; you're a good listener.

  • While you can usually see several sides of an argument, you often have a strong opinion as to which side is correct—the order of things is usually clear to you.

  • Your perspective on the world is based on careful observation, and you know a lot about how people feel in—and react to—many situations.

  • Your exploration of others' feelings has led you to believe that although people generally act appropriately, having clear social rules is very important to a functional society.

  • Time alone for reflection is important to you—you are introspective and aware of your own feelings.

  • Faithful is as faithful does—you expect those with whom you are close to be loyal to you, and you take betrayal of your trust very seriously.

    If you want to be different:
  • Some of the alternate perspectives that you understand may have more value than you give them credit for—keep in mind that right and wrong aren't always so clear-cut.

  • While you are able to reap the benefits of your time alone, and may see interacting with a lot of people as more tiring than exciting, remember that there is a lot to be learned from experiencing things and not just reflecting on them.

  • Tuesday, February 15, 2011

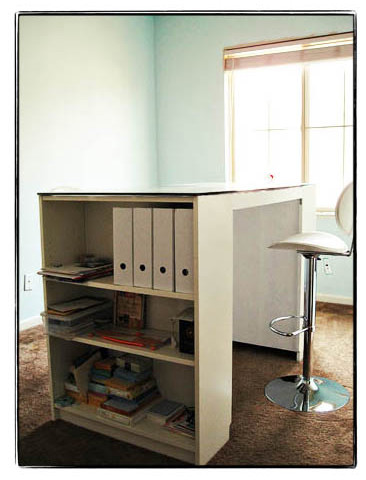
    Craft Room Inspiration

    Omg I want this desk.  Like NOW.

     Source 

    Best part…all the materials are from IKEA and Lowe’s.  I love how the legs are made from bookcases – tons of storage and enough depth to fit plenty of scrapbooks and photo albums.  And I really really really like how tall the desk is, as I would love an excuse to find a cute bar stool. 

    Only problem with the height of this desk is I think we would have to move my crafting stuff from the spare bedroom to the loft as there are higher ceilings up there and more room so I could leave the desk out in the open instead of shoving it against a wall.  But then that means we need to purchase an air conditioner that doesn’t need a window for venting as it’s way too hot up there in the summer.  Hmmmm decisions, decisions… :)

    Monday, February 14, 2011

    New Recipe Review

    Yesterday I made an amazing brunch dish for my hubby…Strawberry Stuffed French Toast, a recipe adapted from Annie’s Eats.  Even though it was tasty, I would rate this recipe a 6/10 as it was not that easy to put together and there is a lot of butter used which I decided to omit.  I had to make a few modifications, as our bread slices were not thick enough to actually slice and stuff the strawberry mixture inside, so I made a sandwich instead :)  However, it still turned out pretty damn good!

     frenchtoast

    Happy Valentine’s Day! 

    Sunday, February 13, 2011

    DIY Beaded Bracelets

    I hosted a Lia Sophia party last fall and got a TON of jewelry with all their free gifts, 50% off deals, etc.  After that party, I made a promise to myself that I had to wear at least one piece of jewelry each day – there’s no excuse for me not to accessorize my outfit every day :)  In the past few months, I noticed that I bought more silver jewelry at the party and had lots of necklaces but no bracelets or earrings to match.  I was having a tough time figuring out what to wear with my brown and more neutral outfits. 

    My parents gave me a Michael’s gift card for Christmas, so I used that to buy some beads.  While at the store, I made sure to look for brown, pink and ivory beads, as those were the colors I was missing in my jewelry collection.  I had the rest of the materials at home already, but if you have never made jewelry before, here’s what you will need for beaded bracelets:

    bracelets set up

    - elasticized string (I used Beadalon brand – 0.5 mm)

    - beads (enough to cover your entire wrist with no gaps)

    - scissors

    - clear nail polish

    - ribbon (optional – I use the Straight & Narrow brand from Michaels)

    Let’s Get Beading!

    1. Cut a piece of the elasticized string that is long enough to cover your wrist plus an extra few inches of slack. (Note - I do not tie a knot at one of the ends of the string now, I wait until all the beads are on the string.)

    2. Start adding beads onto the string however you like – for some bracelets I use the same beads while for other bracelets I will do a pattern and mix different beads together.  Just be careful that the beads don’t slide off the other side of the string while you are adding more on.  Keep adding beads until the strand of beads covers your entire wrist and there are no gaps.

    3. When you are finished with the strand, tie the two ends of the string together as tightly as possible.  Triple-knot the string. 

    4. Pull apart the string slightly so the knot is exposed and no beads are touching it.  Dab a dot of clear nail polish directly onto the knot.  The beads can now touch the knot but let the it dry for a couple minutes.

    bracelets knot

    5. Once the polish is dry, cut off the extra strings with being careful to not cut the knot.  You’re done!

    Some of the bracelets I made today:

    bracelets complete

    bracelets blue green  bracelets blue silver

    bracelets pink 

    Extra step - If you are making several bracelets, you can cut a piece of ribbon to tie all the strands together.  It’s your preference on how big you want the bow – usually I start by cutting the ribbon longer and then experimenting to see if I want it shorter or not.   

    I never double-knot my ribbon strands, so they’re always easy to take off or add back on, depending on where I’m wearing them to.  I used a black ribbon for my silver strand bracelets last year and wore them to a wedding.

    bracelets silver

    bracelets display

    For the newer brown-toned bracelets I made, I cut a piece of ivory ribbon.  I also had a few leftover beads so I made some matching earrings:

    bracelets display 2

    bracelets brown display

    Making your own beaded bracelets does not take a lot of time, they are easy to construct, require very little materials, and you will save tons of money by making your own bracelets compared to buying them in a store.  I always wait until there are sales at Michaels, because they will have 50% off their bead strands and you can usually make 2 bracelets per strand.  Best part is you can customize to match your wardrobe and special occasions.  Enjoy!

    Sharing at:

    Photobucket Join  us Saturdays at tatertotsandjello.com for the weekend wrap <br /> up           party!

    Friday, February 11, 2011

    It’s Friday…let’s have a drink!

    I think everyone in New England is just completely fed up with snow.  I heard last week there’s only like 40 days until the first day of spring?  Anyways, dreaming of warmer weather has me thinking of one of my favorite summery drinks…Leinenkugel’s Berry Weiss.  It’s a very very very fruity beer – something I would definitely recommend for my girl friends to drink if they’re not particularly into beer :)

    I just realized that all the beers I have been including on my “It’s Friday…let’s have a drink” posts were beers we chose for our table names at the wedding, so I might as well include the table name design, since it gives a snippet of what the beer tastes like.  Here’s what I made for the Berry Weiss:

    LeinenkugelBerryWeis

    I first tried this at Beer Fest in Boston a few years ago and fell in love instantly.  And as you can see from my table name design, the guys at Beer Fest suggested to mix it with their Summer Shandy, which is totally brilliant!  The mixture tastes exactly like a berry lemonade and is amazing. 

    source

    Berry Weiss is in liquor stores year-round but Summer Shandy is a seasonal brew.  I’m definitely done with all the dark, heavy beers…summer ales can’t come soon enough!

    Wednesday, February 9, 2011

    Easy Chicken Fettuccine Alfredo

    I originally found a recipe for a low-fat fettuccine alfredo last year but unfortunately I cannot find the link for it anywhere.  I went to make it last week and couldn’t remember any of the measurements, ingredients, etc, so I started visiting my favorite food blogs for help.  I found a few recipes that were similar but I just decided to wing it and this is definitely the best version I have ever made. 

    What I love about this recipe is that it’s fairly healthy as it’s low-fat and you can add in whatever you like – chicken, broccoli, other veggies, etc.  The other nice thing is that it’s filling, so you don’t need to eat as much and you’ll have plenty of leftovers!

    alfredo

    Ingredients:

    - 1 package of fettuccine noodles

    - 1 8 oz package fat-free cream cheese, softened (at room temp)

    - 3/4 cup fat-free half and half (I started with 1/2 cup but wanted it a little creamier, so this is to your preference)

    - 1/2 teaspoon ground pepper

    - 2 cups frozen chicken strips (we use Tyson brand)

    - 1 tablespoon olive oil

    - 1 cup shredded parmesan cheese

    Let’s Get Cooking!

    1. In a large pot, cook the noodles in boiling water for 8-9 minutes.  While noodles are cooking, heat the frozen chicken strips on a plate in the microwave for 2 minutes, so they get slightly warm.  Set aside for now.

    2. In a large skillet, heat the olive oil on medium heat.  Add in the cream cheese and half and half, stir until completely melted. 

    3. Add in parmesan cheese and pepper and stir until well combined.  Let the mixture heat for a few minutes, while continuing to stir.

    4. Drain the fettuccine noodles and then mix noodles into the alfredo mixture.  Stir well until all noodles are covered.  Add in chicken strips and mix well.  Let entire mixture heat for a few minutes so chicken gets hot.

    Enjoy!  Next time I will be adding steamed broccoli to my portion as hubby does not believe in eating veggies :)


    Linking to Tatertots & Jello Weekend Wrap-Up Party and I Heart Naptime Sundae Scoop and Paisley Passions

    Sunday, February 6, 2011

    Travel Themed Home Decor…completed

    A couple weeks ago I posted about how I was designing travel themed art for our spare bedroom using some pictures from my international trips.  Luckily hubby found my Italy and Greece pictures but unfortunately the Japan pictures are no where to be found.  I didn’t want to do a Shutterfly purchase for just one thing, so I decided to print out the Japan picture anyways and see how pixel-y it would be.  It didn’t turn out too bad! 

    Here’s the completed designs sitting on the picture shelves…I’m pretty happy with how they turned out despite the major cheapo Ikea frames I put them in…in time I will replace those :)

     greece1

    japan1

    greece2

    japan2

    The guest bedroom area of our spare room is close to being completed!  I will be excited to finally cross that off my 101 in 1001 list…but for now, I can cross off one of the items, as this travel decor project completes my goal of finding an inspirational quote and making an art piece of it. 

    How is the weekend over already?!

    Saturday, February 5, 2011

    Wedding Subway Art

    Subway art is really popular right now in blogging world – basically all the craft sites I stalk have some version of it and holiday-themed ones are very big.  For example…

    Valentine-themed Subway Art from Craftily Ever After

    Christmas-themed Subway Art from Eighteen25


    Subway art is unique, as you can personalize it however you want.  The idea is to have different keywords and phrases and use different fonts and colors to create a bold statement piece.  I wish I had found that inspiration pic for the Christmas-themed art last December because I definitely would have made it!  Oh well, there’s always later this year :)  After I saw the Valentine-themed art from Craftily Ever After,  I decided to try making one of my own.  I love messing around with fonts in Microsoft Publisher and designing projects – which is exactly why I loved creating all my paper goods for the wedding. 

    For this piece of art, I decided to do design something for our bedroom so I could keep it up year round, so I went with our wedding day theme.  It look me about 4-5 hours to complete, as it does take a lot of time selecting words and then figuring out which fonts will look best next to each other.  Then after I was totally done, I made a few more edits so the entire page looked good together.  Here’s the final product…
    WeddingArt

    Each word and phrase has a special meaning to us, as it relates to something important on our wedding day.  I used a lot of song titles, like “I’m Yours” (walked down the aisle to this), “Don’t Stop Believing” (our last song of the night), “Better Together” (what we walked back up the aisle to after we were announced as husband and wife) and there’s some lyrics from “My Wish”, which is the first song we danced to.  I have a couple phrases from readings from the ceremony (“i carry your heart with me” and the blessing to the left of the starfish) and the last two sentences of our vows are on the very bottom.  The clip art includes the adirondack chairs I used on our ceremony programs and place cards, and the starfish was used on the all the elements of the invitations, menus, bar menu, etc. 

    The SURPRISE is in the Boston Red Sox font because Wally the Green Monster showed up at our reception during dinner.  My parents set this up a surprise for us and Wally was a huge hit with our guests.  Blueberries is for our homemade blueberry jam favors and for our vanilla cake layered with blueberry jam.  SPREAD THE LOVE was the actual font used on our tags for the favors.  The “Mr. & Mrs.” is in the Richard Murray font which I used as the main font for all the wedding stuff.  I had room for a few smaller words, so I used classics like “I Do”, “You may kiss the bride”, “Beautiful Day”, etc. 

    I LOVED how it turned out.  It was well worth spending a Friday night at home to do this :)  I designed the art on a 5x7 template in Publisher so this is how it turned out after printing and framing.  The light blue paper and frame are both leftover items from the wedding. 

    weddingart1

    And where it’s now sitting on one of the shelves in our bedroom…


    weddingart2


    If you would like a more general version that can apply to any wedding, I do have a copy in my Etsy shop.  


    Happy Weekend!


    I shared this at …
    Photobucket Join  us Saturdays at tatertotsandjello.com for the weekend wrap 
up           party!

    Thursday, February 3, 2011

    New Recipe Review

    Last night I tried out this recipe for Sun-Dried Tomato and Bacon Chicken and it was GREAT!  Soooo good and and took only 20 minutes to make.  Best part – it’s another healthy recipe :)  I got the recipe from one of my favorite blogs, The Girl Who Ate Everything (surprise, surprise).  This girl makes the best stuff - I like how her recipes don’t need a lot of prep or baking time and they don’t use a ton of crazy ingredients.  

    Here’s her recipe – definitely try it out! 

    A few things that I changed…

    - I used shredded parmesan cheese instead of sprinkled as we had some shredded leftover in the fridge

    - I used 1/2 can of diced tomatoes (drained) instead of whole tomatoes.  Hubby thought it was better this way and it saved some time!

    - I used turkey bacon, as it basically tastes the same as the real stuff

    - The sun-dried tomato dressing I found was a light version made by Newman’s

    sundriedtomato My version of Sun-Dried Tomato and Bacon Chicken

    I give this a 10/10 – hubby LOVED it.  We both agreed this would be even better (if that’s possible) by marinating the chicken in the sun-dried tomato dressing overnight, so we will plan ahead and do that next time.

    (This is the 6th new recipe I have tried for my 101 in 1001 list.)

    Wednesday, February 2, 2011

    Recipe – Baked Mac & Cheese

    I started making this recipe for baked mac & cheese when I was living with a couple of my college friends after we graduated and I had basically no money to spare.  It’s very easy and pretty cheap to throw together and originally adapted from the Campbell’s recipe book I have. 

    But it’s not exactly the tastiest dish – I would rate it a 5/10 as it’s not that cheesy and definitely not bursting with flavor.  I’m assuming that’s due to the condensed cheddar cheese soup and lack of “real” cheese.  All the food blogs I follow just totally hate on condensed soup and I can understand why with this recipe.  I think canned soup can be a great time saver if used with a lot of other ingredients.  For this recipe, it’s basically the cheese that needs to shine, though, so now I’m on a mission to bump this meal up a little.  The recipe below is what I made earlier this week and it’s definitely better – but not perfect yet.

    maccheesesorry for the crappy lighting…I need to make meals when it’s 2 in the afternoon and much sunnier in our kitchen :) 

    Ingredients:

    - 1 can Campbell’s cheddar cheese soup

    - 3/4 cup skim milk

    - 1/4 teaspoon ground black pepper

    - 1/4 teaspoon ground mustard

    - 3 cups pasta (I usually use rotini, but shells work, too)

    - 1 cup shredded extra sharp cheddar cheese

    - 3/4 cup dry bread crumbs

    - 2 tablespoons margarine or butter

    Let’s Bake!

    1. Pre-heat oven to 400 degrees.  Boil a large pot of water and cook pasta until it’s al dente and then drain.

    2. In a large mixing bowl, mix cheddar cheese soup, milk, ground mustard and pepper until well combined.  Add in the pasta and mix completely.  Transfer the mixture into a 8 x 8 baking dish.

    3. Shred the cheddar cheese using a grater.  Sprinkle the shredded cheddar cheese over the entire top of the pasta mixture.

    4. Melt butter or margarine in the microwave in a small bowl.  Stir in bread crumbs and mix well with a fork.  Sprinkle the bread crumb mixture all over the top of the pasta and cheese mixture.

    5. Bake at 400 degrees for 20 minutes or until bread crumbs are toasted and cheese mixture is bubbling.


    For next time…I will probably try mixing the shredded cheese right in with the soup mixture and possibly add parmesan cheese.  Or I maybe I should stop using the soup altogether and start making real mac and cheese from scratch, but this is just so easy and cheap, it will be hard using a brand new recipe... :)